One Night Stand with React Hooks

The beginning of my new Relationship
Pardon me for such a title, but my creative freedom could only come up with this… However, I seriously mean it. I mean Hooks is such a hottie who's making everyone go crazy. In fact, all the JavaScript Casanovas out there are just looking for an opportunity to hook up with Hooks. 😝
So, as the world was going crazy about React Hooks, it didn't take me so long to discover the hotness of React Hooks. And by this time, I was already yearning for a One Night Stand with React Hooks and finally, I got lucked out. 😬 Now grab a seat as I tell you my steamy story of how I made love with React Hooks. 🥰
Before Hooks, I was married to Class Component to be able to deal with States. And our relationship was great, maybe it sill is. But it's getting complicated, at least for me. 🥴
I'm sure, it's the same with many JavaScript Casanovas. As a human trait, we all instantly fall in love with a shiny new thing. But with React Hooks it was something different and I swear it's not a fling. 😌 Okay, enough is enough, now will you please explain to me what React Hook is? 🙏
Hold on for a while, before I talk about Hooks, wouldn't it make more sense to discuss how was my relationship with the conventional Class Components? 🤔 Then let me give you permission to check out my ex. 👇
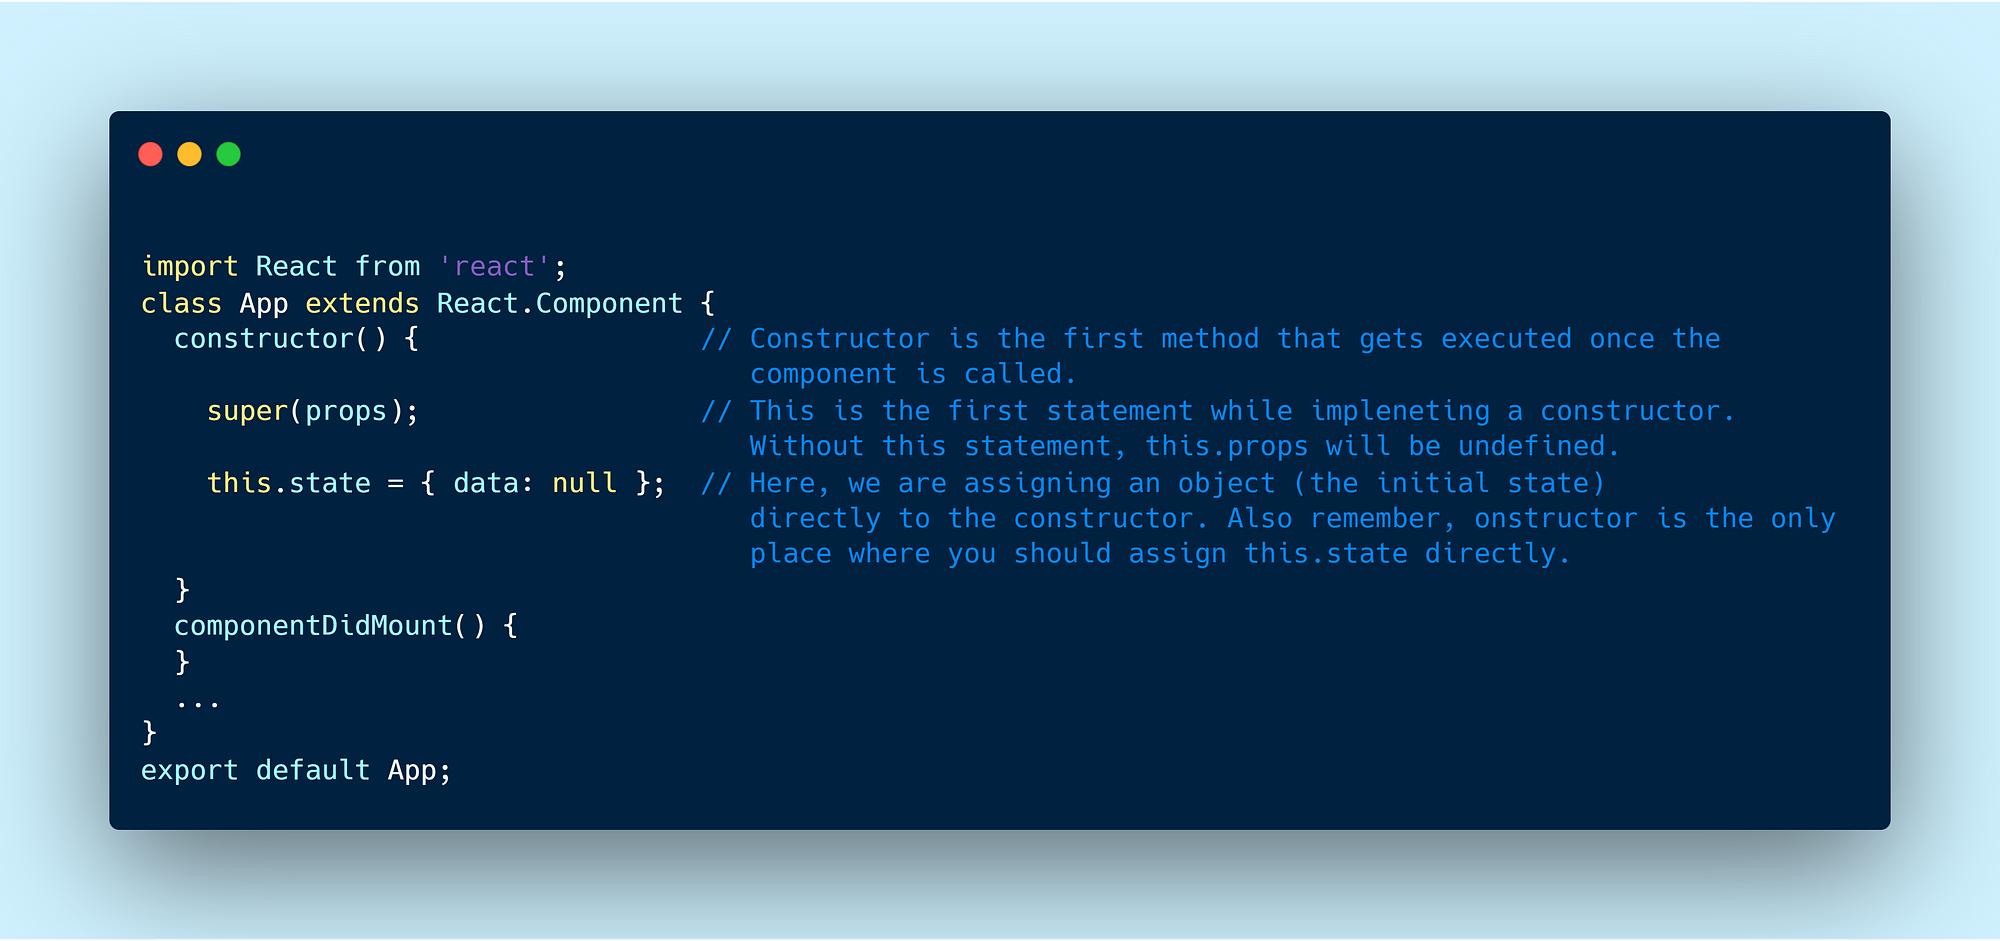
Well, she was also pretty. At least before I saw Hooks. 😌 And I assume you could clearly read those comment lines that explain each line of the code snippet. So, let's talk about componentDidMount() lifecycle method. It was the de facto way to fetch data. And people are still using it which is totally fine. In future updates of React, we could do the same thing more efficiently with Suspense. But let's save it for later. Back to our topic.
So, in the method componentDidMount, DidMount makes it clear that when this method is invoked or runs, the component was already run with the render( ) method and it would run again when the fetched data is stored in the local state with the help of setState( ). And when it's stored in the local state it can then be used in the render() method to display something or pass them as props.
Time to build something…
Enough talk, we will now build a small application that fetches data from the widely known HackerNews API and render them in our app. Awesome, let's get coding…
You can either use create-react-app or use Codesandbox. For this tutorial, I'll recommend Codesandbox. It's easy to set up and makes it seamless to start and deploy an application. Click here to create a new Codesandbox project.
Please make sure you type each line of code rather than copy-pasting. It's important to actually type this stuff out and try it yourself. Okay, you got the point, let's move on…
Now in the App.js file replace the content with the below code:

Again to remind you, here we are using the HackerNews API to fetch popular React articles. And obviously, you can use your own API or any other API of your own choice. There is also another API that's provided by JSONPlaceholder for testing purposes. So here, once the data is fetched, we are storing it in the local state using this.setState() method. And as I've explained it earlier, once it's stored in the local state it will then be used by the render( ) method.
Cool, let's now write our render method where we will display the fetched data using the map function. In a simple way, it lets us convert one array to another array with the modified data.
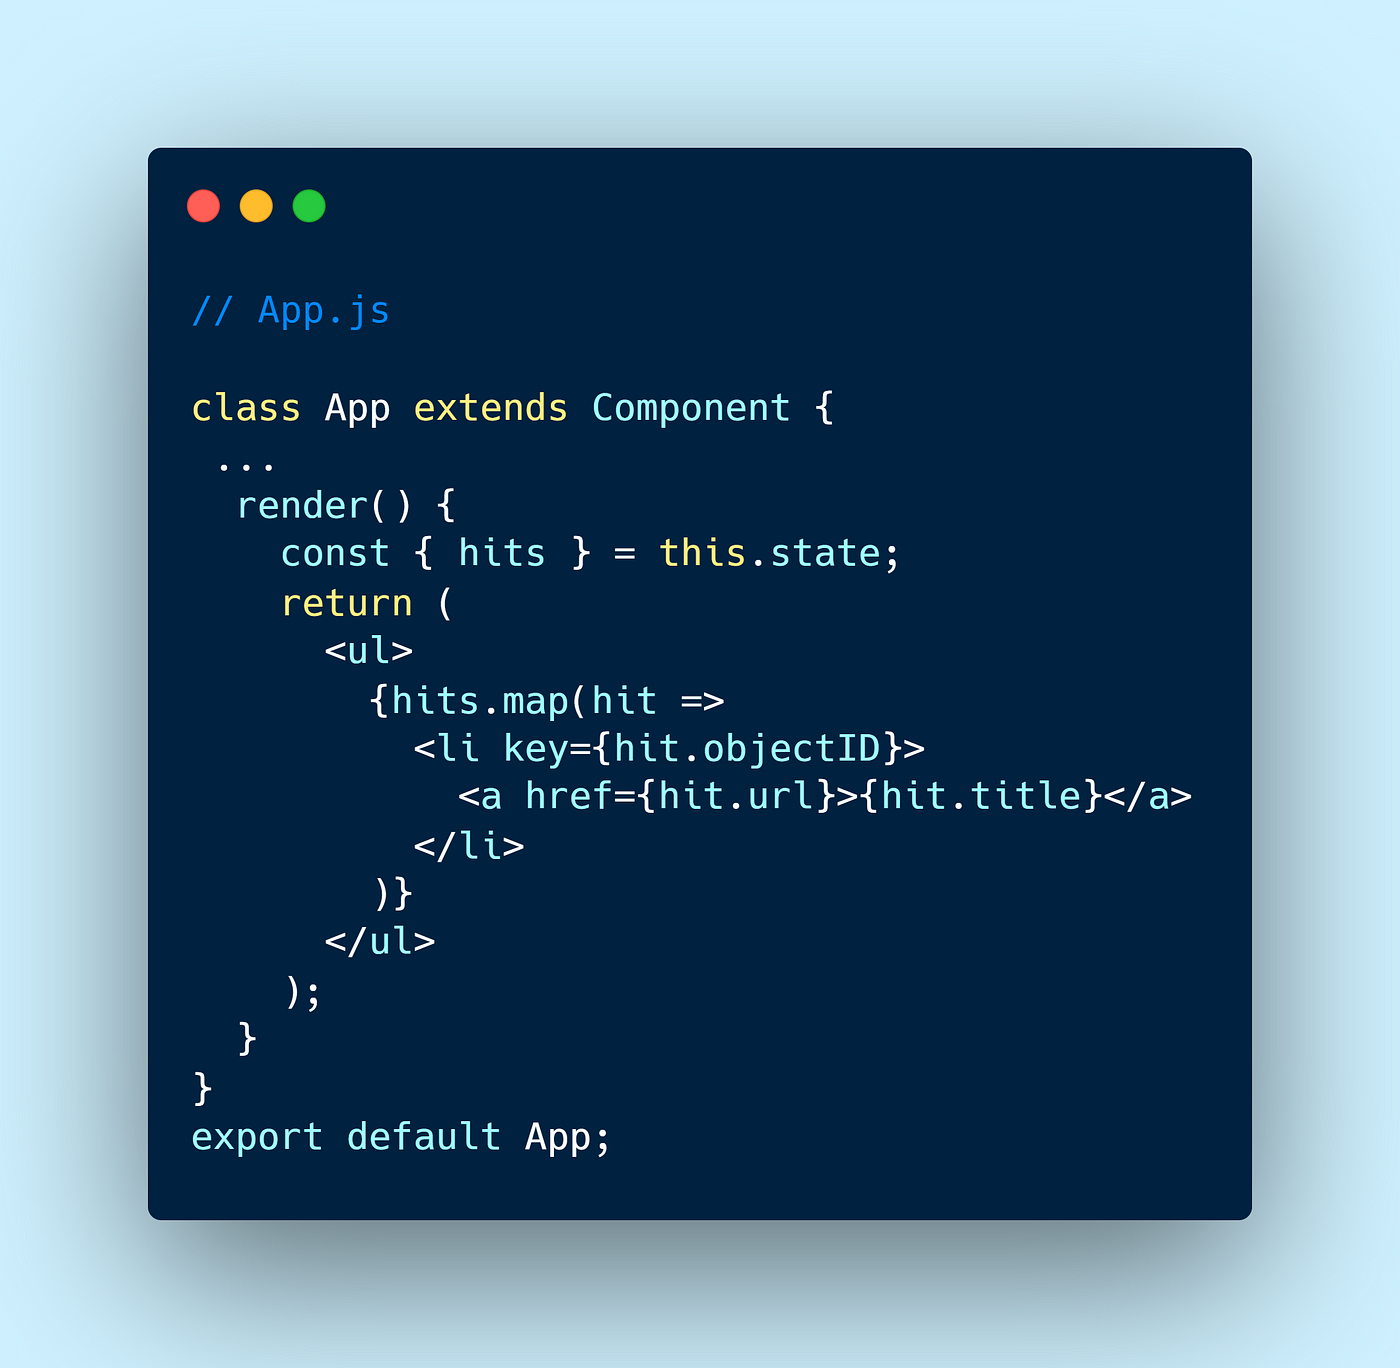
Here, our App component uses the map function to create a new array that has the same number of elements, and where each element is the result of calling the function that we are providing.
There are some minor things in our code like: hit, objectID, url, title and if you are wondering where the hell it all came from then please open the HackerNews API in your browser or Postman. As you can see in the JSON response, hits is an array of data from the HN API which has this following key pairs: objectID , url and title.
There is one more thing that you might've noticed, I used the item's array index as the key prop in the example above. React relies on the key to identify items on the list. Remember React uses a virtual DOM, and it only redraws the components that changed since the last render. So, this is it. Now everything should be working fine.
Try it on Codesandbox
Meet my new girlfriend, Ms. React Hooks:
Now it's high time that I introduce you to my new girlfriend, React Hooks. I know you all have been waiting for this moment. 😏
Often times as we build out React applications, we see ourselves writing almost the same exact codes in two or more different components. Ideally what we could do in such cases would be to extract that recurrent logic into a reusable piece of code (hook) and reuse it where the need be.
This is the whole idea behind custom hooks. So, without any further ado, let's build a Custom Hook for fetching data from the widely known Hacker News API to fetch popular React articles from the closet.
Okay, let's reinvent the wheel with React Hooks:
As you have already got the idea, we will be implementing the same feature that we have done earlier with thecomponentDidMount() in a class component to a more sustainable way using React Hooks inside a Functional Component. So, let's get our hands dirty. 😬
Click here to create a new Codesandbox project.
Once done, replace your app.js file with the code below.
If you have written the snippet it's probably going to show some errors. Don't panic just yet.
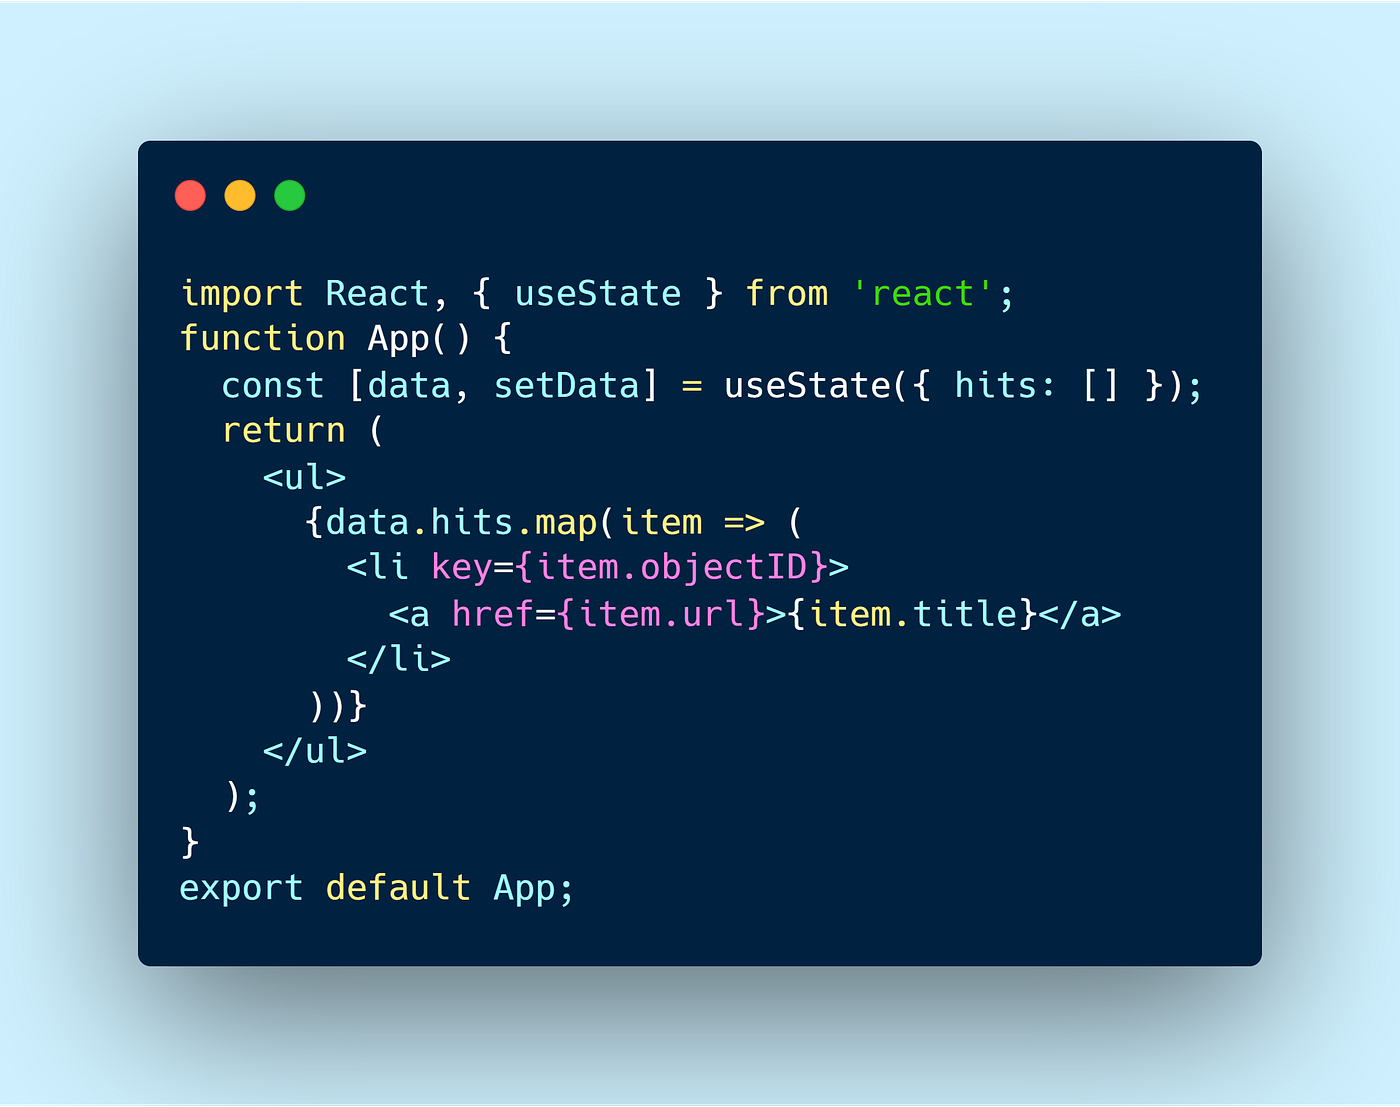
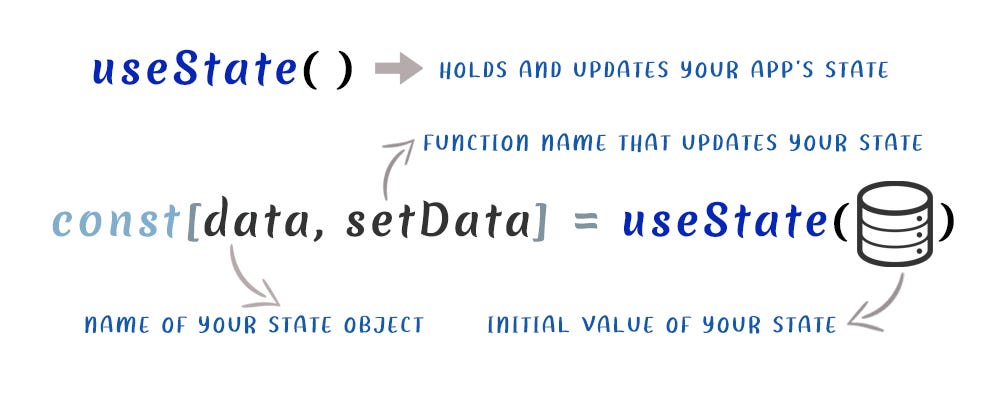
So, here we have written a Functional Component that's going to show a list of popular React articles from Hacker News. We are using a hook called useState that's responsible to manage the local state for the data that we are going to fetch for the App component. Refer to the image below to get a clear idea about the useState hook.
In our example, the initial state is an empty list of hits which is an object that represents our data.
We are going to use axios to fetch data, but it's up to you to use another data fetching library or the native fetch API of the browser. Add axios as a dependency in Codesandbox or type npm install axios in your CLI, if you are doing this in your local system.
The magic of useEffect Hook:
We are now going to use another built-in hook called useEffect. It lets you perform side effects in function components. Side effects can mean anything from updating the document title to making an API request. Anything that happens outside your React render tree is a side effect for the component.
Think of this as a function that can handle lifecycle events directly inside function components. Here's the best part, useEffect replaces three different API methods (componentDidMount, componentDidUpdate and componentWillUnmount). All with one function! Crazy, Isn't it? Let's see the magic by actually using it in our example.
Additionally, you can read the Complete guide to useEffect by Dan Abramov for an in-depth understanding of useEffect.
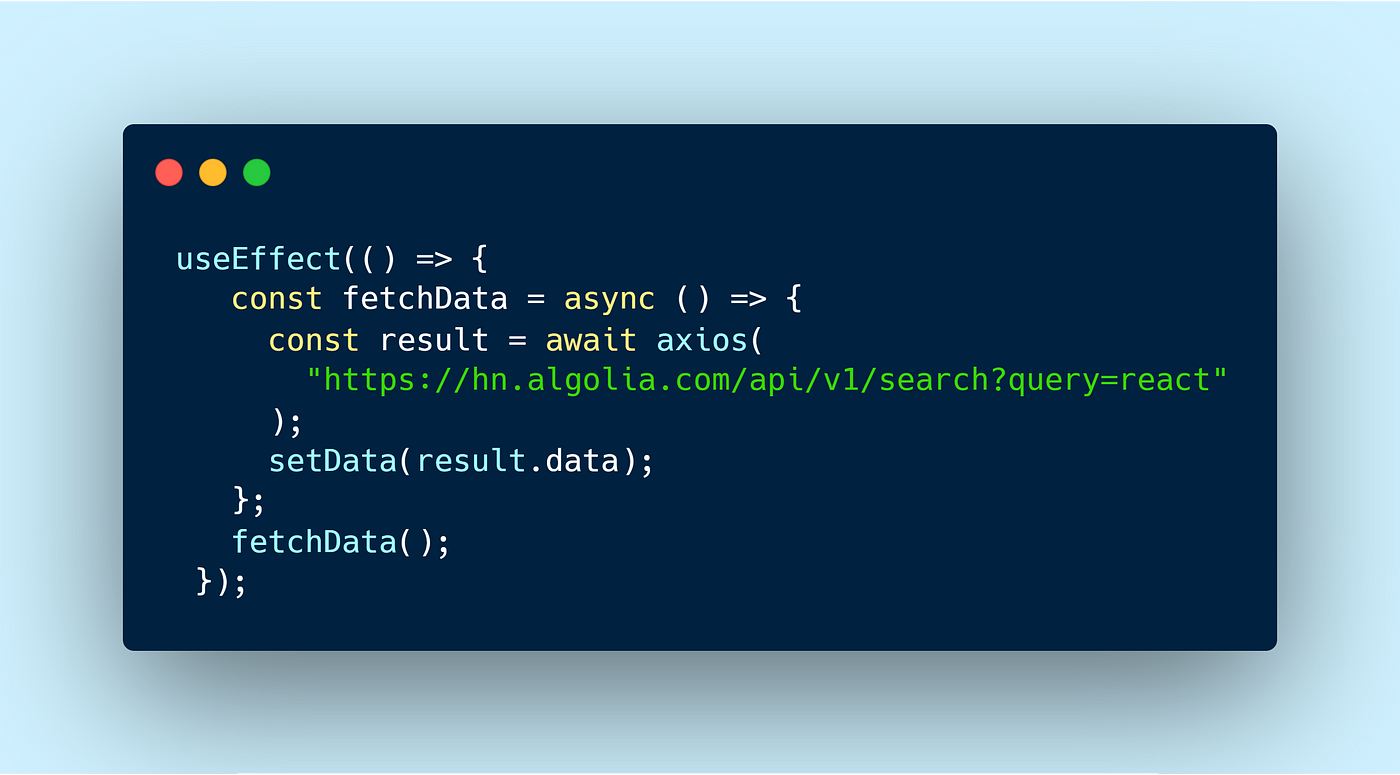
Now, let's add this function to our App component and everything should work fine. Please notice that we are here using async, await for fetching the data. In the above example, we have used the common way of dealing with JavaScript promises by using their then() blocks. What about the next generation of asynchronous requests in JavaScript? This is why I've refactored this example to use async/await.
Okay, so the code above feels familiar and looks like my ex-girlfriend but in a different suit. 😜 Yes, I'm talking about componentDidMount in a conventional class component. It's not exactly similar but yeah it's now more readable, more clear, very much concise and straight forward. I told you, React Hook is a hottie. 👌
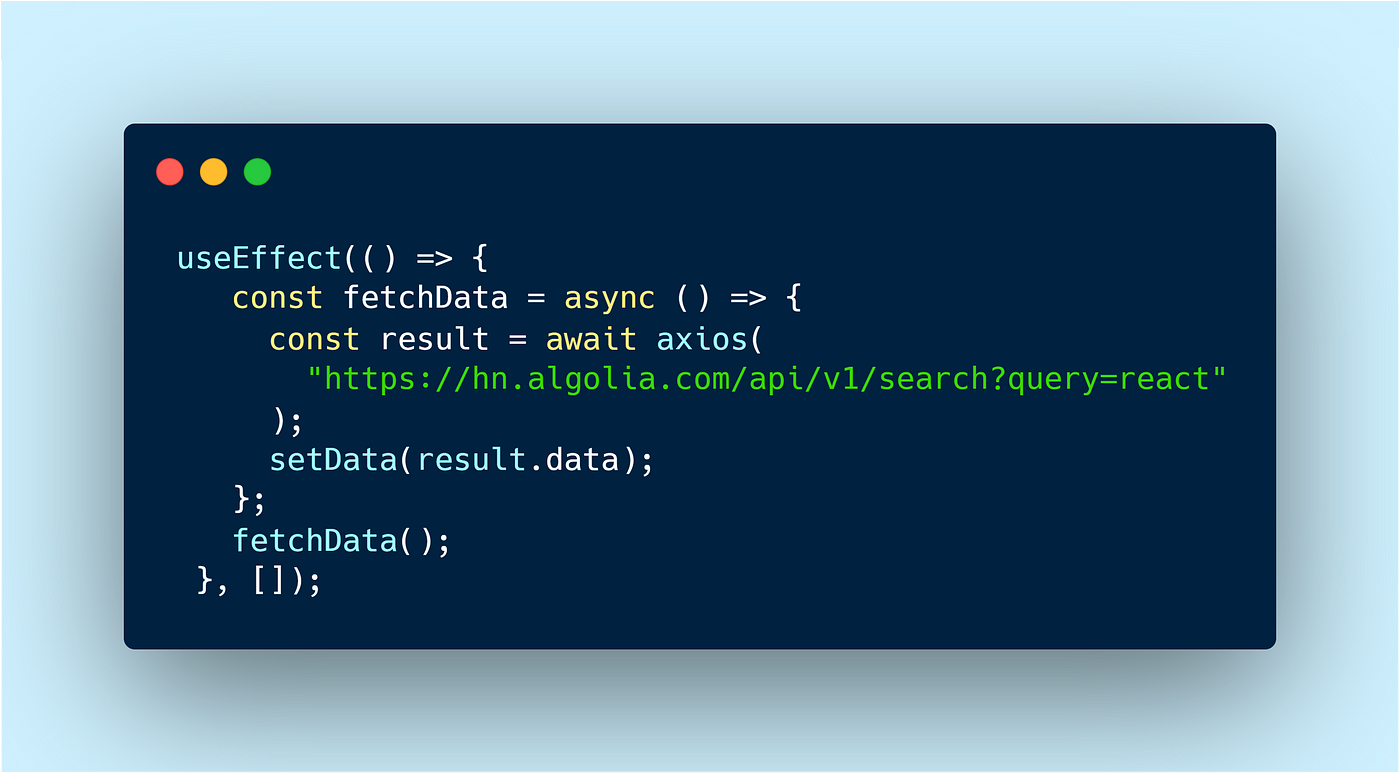
But wait, don't get excited just yet. The above code has a bug! Beauty comes with a price. 😏 Now open the preview on a different page of your browser then go to the Network tab. As you can see, it's on an infinite loop of fetching data. What went wrong? 🤔 In a class component, componentDidMount is called after the component has mounted. It fires just once. But on the other hand, the effect inside useEffect is applied on every render by default. It lets us pass an optional argument - an array of dependencies that informs React when should the effect be re-applied. If none of the dependencies change, the effect will not be re-applied. So, let's add an empty array at the end like so…
Awesome! Now everything should work fine. Check your code for any inconsistency and compare it with my Codesandbox Demo. Let's extract our custom hook so that we could reuse the component logic somewhere else.
Encapsulating our Custom Hook:
Create another file called useFetch.js and replace it with the code below.
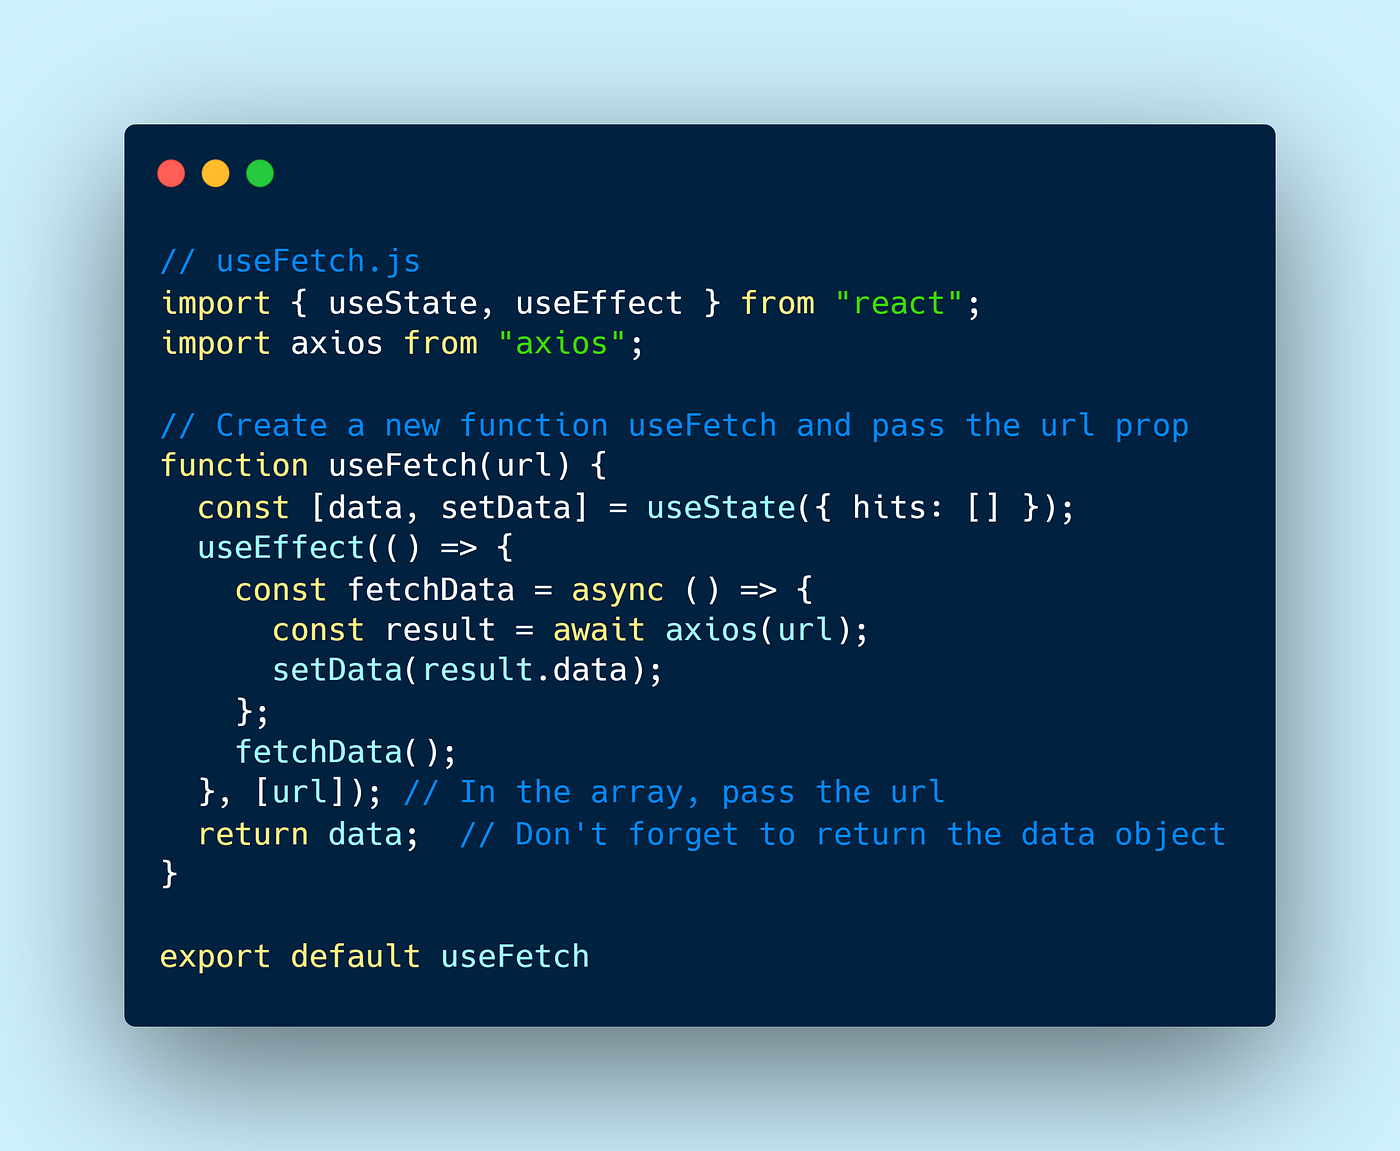
Pretty straight forward. Just don't forget to return the data object. Otherwise, you'll see an error something like this: Cannot read property 'hits' of undefined. Which is pretty obvious because our function should always return something.
Now go to the App.js and replace it with this:

Try it on Codesandbox.
Congratulations!! 🥳 Apparently, you have just fallen in love with my new girlfriend, Ms. React Hook. 😜 Also, congratulations on creating your first Custom React Hook. 👏
But this is not the end of the story. First I just only thought of having a One Night Stand and then forget. But as it rarely happens in life and we always end up developing some kind of attachment. Which is what happened with me. I'm now falling in love with React Hooks.
Time to say Good Bye! 👋
Thanks for reading this so far. I think you enjoyed this article. If so, please hit the 👏 button and let others too know about this. If you have any feedback, do comment below.
You can follow me on Medium, and Twitter. If you have any doubts, or need any kind of mentorship or just want to casually talk about your life feel free to ping me on Twitter. I would be happy to help.
I am currently looking for some freelance opportunities. I'm interested in building any kind of Saas Products and would love to hear your ideas. Feel free to contact me at howdysourav@gmail.com 🔥🔥🔥
Until then,
Happy Coding!